Installing Python packages for Computer Vision and Machine Learning for windows
In this blog post we are gonna setup our windows environment for diving deep into the field of Computer Vision & Machine learning using Python! Yes… the famous subset of Artificial Intelligence !!!
The hardest part of this field is getting started, as the libraries in python are open source lot of versions will be there which makes us confuse on which to choose and which not to. Don’t worry I got you covered as I have a little experience on setting up environment in windows! Let’s get Started!
System Requirement:
Any system that has windows OS (7, 8, 10). I am using windows 10 and the installation will be preceded in the same. And I hope there won’t be any problem for win 7 & 8 as well.
Step 1 – Installing Python:
You can do the hard way or you can sit back and relax while the system does the hard work for you. In order to get started quickly I personally recommend the smart way.
“Anaconda is the key”Anaconda is a freemium open source distribution of the Python and R programming languages for large-scale data processing, predictive analytics, and scientific computing, that aims to simplify package management and deployment.
So we are going to use anaconda for installing python packages, as it already has the necessary packages for machine learning!
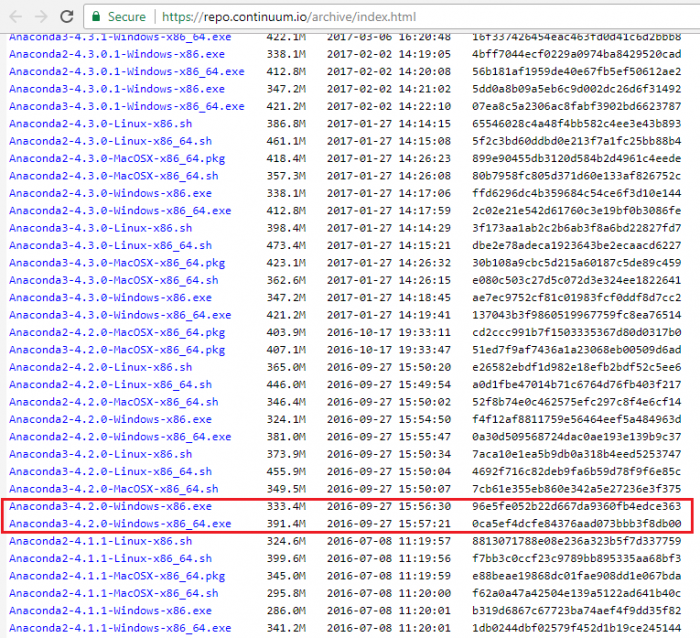
In the official page of anaconda, you can see two versions of python (2.7 & 3.6), But I have python 3.5 for all my works and it is pretty stable, And I don’t know how python 3.6 might work, so go to this Anaconda installer archive site, where you can see the previous versions, in that choose Anaconda3-4.2.0 version, if you are using 32 bit OS choose x86 else choose x86_64 as shown in the below image. And it is better to go with 32 bit version when you don’t know about your OS spec.
Once download run the .exe in administrative mode, and follow as the images given below.
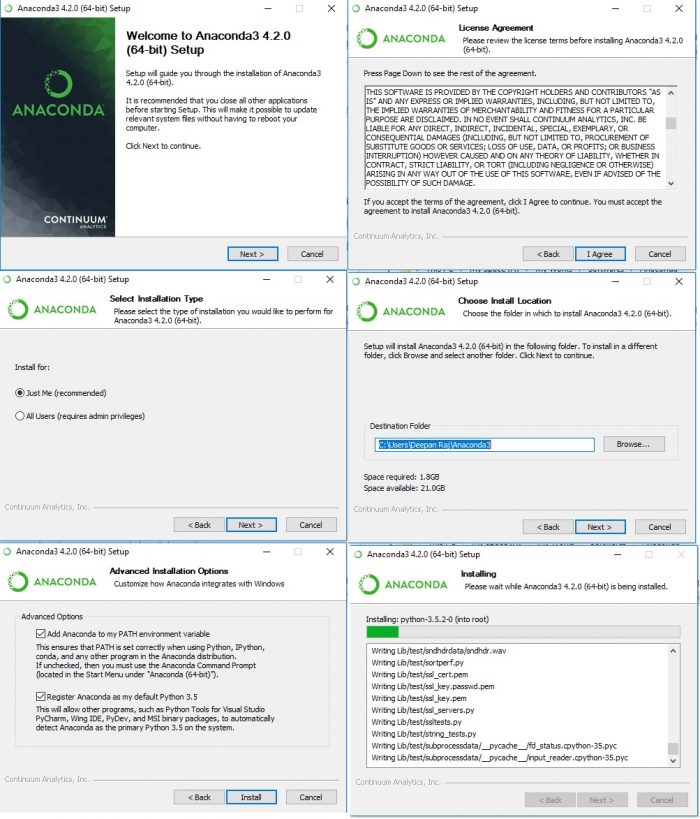
Click Finish to close the wizard after the installation is complete.
Now in order to check, whether it is installed perfectly or not, go to command prompt, just search cmd in windows search bar.
In the command prompt type python -> click enter
It should appear like:

Else, we have to setup the environment variable, for that just search environment variable in windows search, you will get a window like this
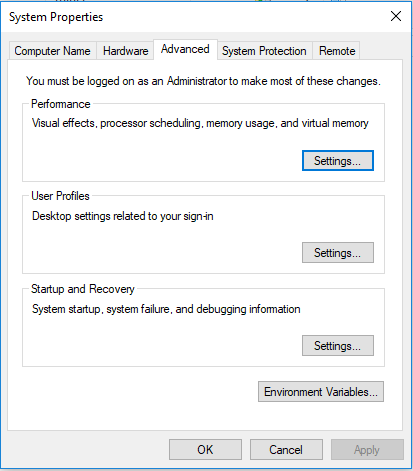
In that go and edit option for the PATH variable and add the following in it.
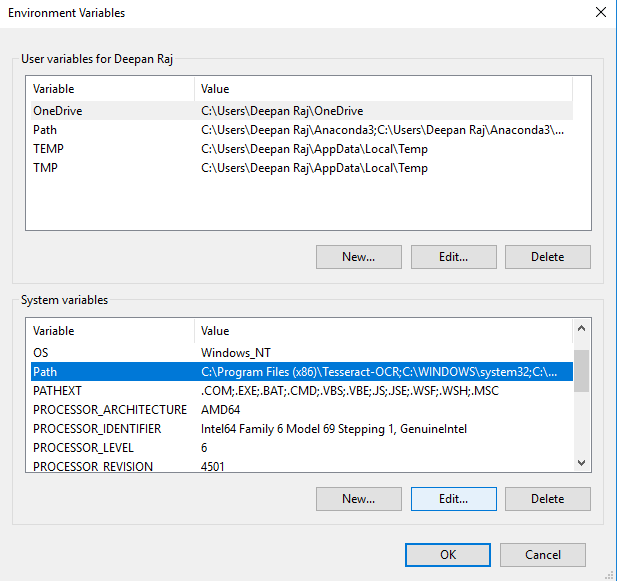
Yourpath\Anaconda3
Yourpath\Anaconda3\Scripts
Yourpath\Anaconda3\Library\bin
Yourpath\Anaconda3\Lib\site-packages
Make sure there is “;” (semicolon) added for every line like this (yourpath\anaconda3;yourpath\anaconda3\scripts) in the path
Once it is done, take 5 min break and then type python in the command prompt, you must get it this time.
Now that anaconda is installed with pre-defined packages and I hope that covers the packages of machine learning, yet still we need to install OpenCV (an important library for Computer Vision)
For that we have to install numpy first , as OpenCV is highly dependent on it.
Step 2 – Installing Numpy:
“Conda install numpy” in the command prompt will do the trick.
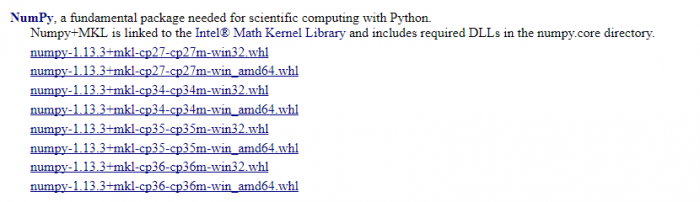
Else go to this link and download, numpy‑1.13.3+mkl‑cp35‑cp35m‑win32.whl as shown in the below image.
Once it is downloaded, go the downloaded directory via command prompt using CD command, or let me tell you a simple trick to enter the directory.
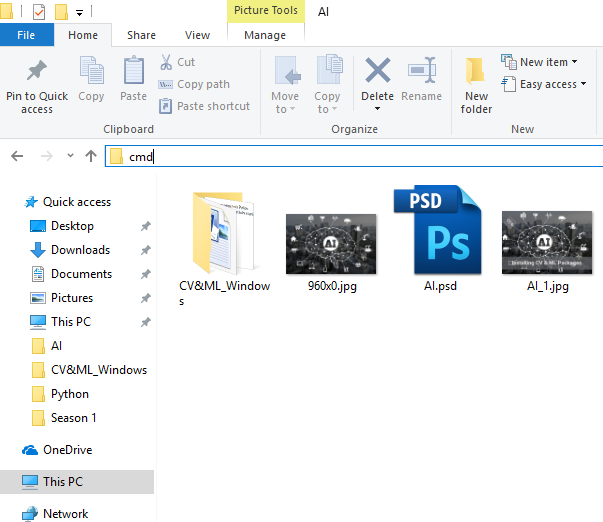
Just go the directory where the package is downloaded, and in the search bar type cmd and press enter, and the magic spell will call the command prompt in the same directory like this
And now type “pip install numpy‑1.13.3+mkl‑cp35‑cp35m‑win32.whl” in the command prompt and you can see the package will be installed at ease.

Final Step – Installing OpenCV
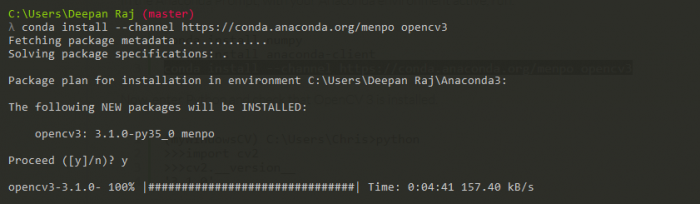
Just go to command prompt and type “conda install –channel https://conda.anaconda.org/menpo opencv3″
The magic will occur by prompting yes or no to proceed the installation, type ‘y’ and enter, the rest will be dealt.
If you have trouble installing it as some network proxies will not allow under the hood installation. In that case we have to install in the same way as we did for numpy’s alternate method of installation,
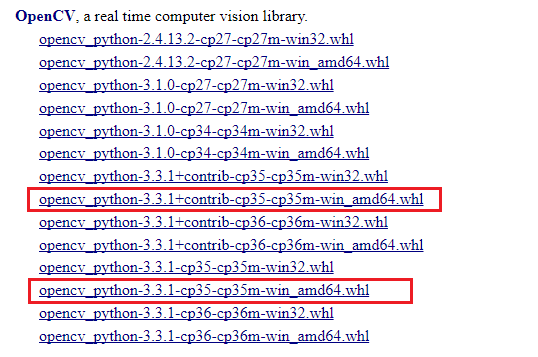
Go to the same link and search for opencv , download these two packages as shown below
And do the same trick as we did for numpy, go the directory and install both the packages by typing the command one by one
Pip install opencv_python-3.3.1-cp35-cp35m-win_amd64.whl
Pip install opencv_python‑3.3.1+contrib‑cp35‑cp35m‑win_amd64.whl
And I personally prefer this method as we can install the latest version of opencv
And now for the final check
Go to command prompt and type “python”
And then type “import cv2”
Then “cv2.__version__”
The result should be exactly like this shown in the below figure followed by no errors,

Note: if you find any problem during installation and if the PC has freshly installed windows, then it is better to install visual studio from this link. and follow the steps from this image. And then follow from step 1.

Congratulate yourself as we have successfully installed computer Vision and Machine learning packages, it’s time for rock and rolla